
This tutorial is designed to help people who have never used a computer before. We will concentrate on using the mouse and a few other basic skills. Ask a librarian for information on local computer classes for more in-depth instruction.
Introducing the Mouse
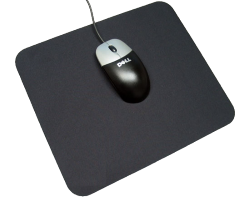
A mouse is a palm-sized device used to control the movement of an object on the computer screen called the cursor, or pointer.
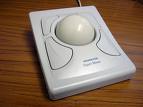
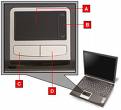
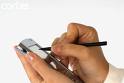
Alternative controllers include:
 |
 |
 |
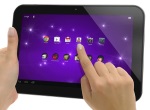 |
| a track ball | a touchpad | a stylus | or your finger! |
Introducing the Cursor
|
The mouse cursor, controlled by moving the mouse, acts as our virtual finger inside the computer screen, allowing us to press buttons, to select items from menus, and to interact with other objects we see on the computer screen. To the right is an animation showing a cursor pointing at a button on the screen and clicking on it. |
|
Other Cursor Shapes
The cursor is an arrow or other symbol on the screen that moves as you move the mouse. The cursor shape changes depending on what is being pointed at on the screen. It is usually an arrow, but its appearance will vary depending on whether it is over text, blank space, or a website link, among other things
|
|
from the arrow shape to a pointing finger to an i-beam |
Mouse and Cursor Working Together
|
To interact with objects on the screen, the cursor is moved over the object by moving the mouse and a button on the mouse (usually the left button) is depressed or "clicked". -- We will practice this in a minute. Most mice have two buttons, while some may have additional buttons, or even a wheel between the buttons for scrolling up and down through the information on the screen. |
|
Positioning the Mouse
|
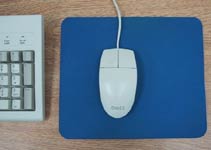
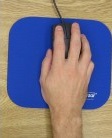
The mouse rests on the mouse pad next to the keyboard with the cord pointing away from you toward the back of the desk. Be sure your mouse pad is free of any papers or other items. Right-handed people usually position the mouse on the right side of the keyboard. Lefties sometimes keep this position, but may be more comfortable moving the mouse to the left side of the keyboard so that they may easily use their dominant hand for mouse operation. |
|
Holding the Mouse
|
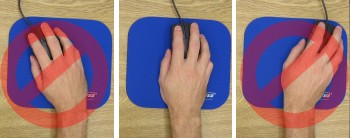
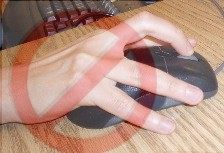
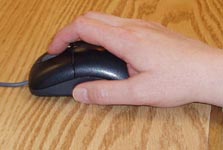
Rest your wrist on the mouse pad or desk, with the palm of your hand resting on the back portion of the mouse. Hold the sides of the mouse with your thumb and last two fingers, keeping your wrist on the surface of the desk or mouse pad. Place your index finger on the left button, middle finger on the right button, taking care not to depress or click the buttons. |
|
Ergonomics
|
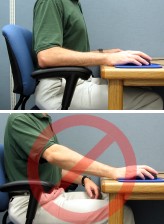
When learning to use a mouse it is important that you develop good habits so that you do not strain your wrist, arm, or shoulder. Ideally, your arm should be hanging at your side and bent at the elbow. You should be able to reach the mouse without extending your arm. Your forearm should be level with the table. |
  |
Moving the Mouse
| Slide the mouse around on the mouse pad or desk. Watch the screen to see what happens to the cursor. |
|
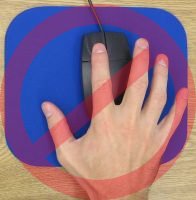
| Do not turn the mouse to move left or right (as if you are steering a toy car). Slide it left or right with the buttons still facing forward. |
|
Moving the Mouse
|
If you run out of room to move the mouse, you can lift it up and set it down a few inches over as needed. The cursor will not move while the mouse is in the air. Try it now! |

|
Clicking the Mouse
Clicking the mouse button is one way of sending commands to the computer (another is using the keyboard).
Clicking is primarily done with the left mouse button, but occasionally right-clicking is necessary.
Clicking is done with a purpose: in other words, you find the element on the screen that you want to click, and then click it to make something happen.
To practice clicking, we will point to a blank space. Our cursor will be shaped like the arrow. Without lifting your finger off the left button, gently press and release the button. Be careful not to move the mouse while you are clicking. The secret is to keep your hand relaxed on the mouse as you press down and release the button. Keep your thumb and other fingers in the "holding" position discussed earlier. Use about as much pressure and speed as you would if you were idly tapping your finger on a tabletop.
Before we start more purposeful clicking, we want you to be aware of some other common clicking problems.
Common Clicking Problems
|
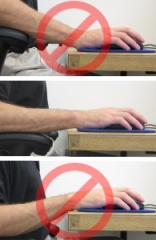
Pressing too hard or too long If you press the button too hard or hold it down, the mouse could move, making your click ineffective. Clicking should be a very gentle action, requiring only enough force to push the button down. Remember, a quick and light depression of the button that produces a "click" sound is all you need. |
|
Common Clicking Problems
|
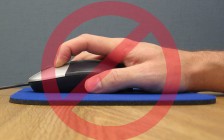
Letting go of the mouse If you let go of the mouse while you click, the mouse will move. You should continue to hold it while clicking. Many people keep one hand on the mouse continually while using the internet, only letting go when they need both hands on the keyboard. |
|
Common Clicking Problems
|
Clicking the Scroll Wheel/Wrong Mouse Button Remember to click the left mouse button. People who are unfamiliar with a mouse that has a scroll wheel are tempted to click the wheel because it stands out. You want the button that is to the left of the wheel. From now on we will use our clicking skills to advance through the pages that follow. Point to the large green arrow and notice that your cursor changes to a hand with a pointing finger shape. This means this image is "clickable" and something will happen when we click on it. Click on the arrow and we will advance to the next page. |
|

Clicking the Mouse
Great Job!
Often, words are clicked to move to another page. Usually, these words (referred to as "links") are underlined and appear in a different color than the rest of the text. The cursor will change to the pointing finger when it is over a link. Find the link in the text below and click on it.
Click here to go to the next page.
Clicking on Icons
|
One way to start programs on your computer is to use the picture icons on the "desktop". The desktop is the area that appears on the screen after the computer is turned on. The first way to start a program using its icon is to click once on the icon (this highlights the icon). Then tap the "Enter" key on the keyboard to start the program. Practice with the icons on the right. For the purposes of this tutorial, a new small window will pop-up on the screen. Read and follow the directions in the new pop-up window to close it. |
Click an icon below and then tap the 'Enter' key 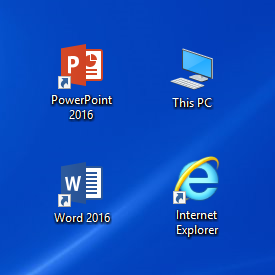
|
Double-clicking
|
Another way to start a program is to double-click on its icon. Double-clicking is a slightly more difficult skill. It involves clicking the left button twice in rapid succession without letting the mouse move between clicks. The key to double-clicking successfully is to keep your hand relaxed and not press the button too hard. Try double-clicking each of the icons to the right to make a small popup window open. Follow the directions on the small popup window to close it. |
Double-click each of the icons below. 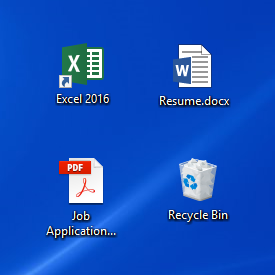
|
Dragging a Window
|
A mouse skill that can come in very handy is called Clicking and Dragging, or sometimes just Dragging, since the click is understood. Clicking and Dragging involves pointing to a particular place on an object you want to move, clicking there, but keeping the mouse button held down. Finally, you move your mouse to move the object. Let's try it!
Congratulations! You just dragged a window. Now close the window and go to the next page. |
Start this program |
Right Clicking
|
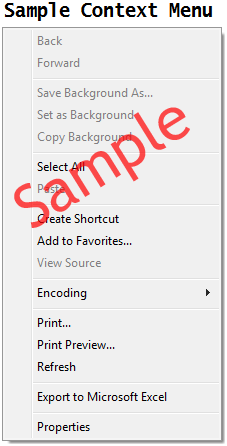
Clicking the right button of the mouse opens up what is called a context menu. A sample image is shown to the right. If you accidentally open a context menu, you can close it again by moving the mouse cursor off of the grey menu box and then clicking the left mouse button. Try right-clicking now to open a context menu, then close it. |
|

Congratulations! You're doing great!
|
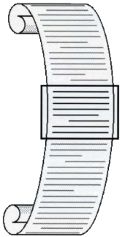
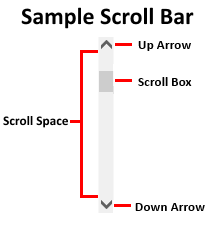
Now that you have become familiar with the basics of using the mouse, we will cover more skills that you will need, starting with the scroll bar. On the right side of the screen, there is a grey bar with arrows at the top and bottom (in the area indicated by the moving hand). This is called a "scroll bar". It allows you to move up and down within the screen to see additional items that are hidden by the limitations of the screen's size--kind of like reading a real-life, paper scroll. There are several ways to use the scroll bar. We will cover the four most effective methods. |
|
Scrolling
|
|
Using the Arrows on the Keyboard To move down the page, press the downward pointing arrow on the keyboard. Each time you press the key, the document will scroll a small increment. To return to the top of the document, press the up arrow. Press the down arrow until you reach the bottom of the page. |

Good job!
Scrolling
|
Using the Scroll Arrows At the top and bottom ends of the scroll bar there are UP and DOWN arrows that can also be used to scroll a long page. Positon the cursor on the down arrow and click. One click will move the page about one line. Holding the button down will continue the scrolling. Click on the other end to scroll back and show what was previously displayed. Try this now. |

Scrolling
|
|
Using the Scroll Box Notice within the scroll bar that there is a darker grey area, called the scroll box, which stands out from the rest of the bar. This box varies in size depending on how much additional information there is beneath the visible part of the screen. The scroll box is like an elevator. To scroll up or down the page using this box, position the cursor over the scroll box, hold down the left mouse button and "drag" the scroll box up or down. It may change to a darker color when you are holding and dragging it. Release the mouse button when you have reached the desired location. |
Scrolling
|
Using the Scroll Wheel on the Mouse If your mouse is equipped with a scroll wheel, you can move up and down the page by rolling the wheel with your finger. Using your index finger, gently roll the wheel towards you to scroll down or away from you to scroll up. Try this now. |

|
Horizontal scroll bars allows you to move the content left and right if the content is too wide to fit the screen. These horizontal bars work the same way vertical scroll bars do. Find the horizontal scroll bar at the bottom of the window (in the area indicated by the moving hand). Try the horizontal scroll bar now by either clicking and dragging with the left mouse button or by using the right and left arrow keys on the keyboard. |
 |

Additional Skills: Text Boxes
Now you're cruisin' along!
|
|
|
|
Additional Skills: Drop-Down List Boxes
|
Where would you like to go?
|
|
Additional Skills: Scroll List Box
|
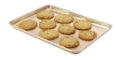
Preferred kind of pie...
|
|
Additonal Skills: Check Boxes
|
Pick a dessert:
Cake |
|


Additional Skills: Option Buttons
|
|
|
Learning to Highlight
Highlighting is very important skill. We use highlighting to select things we want to make changes to.
Highlighted words look like this.
-
Highlighting is accomplished by using the clicking and dragging method with the mouse.
-
The two keys to successful highlighting are to use precision at the starting point and to keep the mouse button held down until you are satisfied with the selection.
- Once the mouse button is released, the highlighting is complete, and clicking anywhere else at that time will undo the highlighting.
Let's try to highlight the word Learning near the top of this screen:
-
Move your mouse cursor to the very left edge of the L. It should turn into an I-beam when it is close to the L. Make sure the I-beam is even with the letter.
-
Then, hold the mouse button in, and drag across the rest of the letters.
-
The background should turn blue when they are highlighted. When you let go of the mouse button, you have told the computer you are done with the selection.
-
Click in a blank space and note that the word is "deselected".
Practicing Highlighting
Try to highlight the purple "Practicing Highlighting" words this time. Position your cursor carefully, then click and drag straight across until you reach the end of the line, and then let go of the mouse button.
If you think you made a mistake because extra things get highlighted, don't let go! The computer only keeps track of where you start and where you finish. It doesn't matter how you get there. As long as you haven't let go, you can "back up" the mouse to reduce your selection.
You can also highlight more than one line at a time. When you are going to select multiple lines of text, you only need to drag partially across the first line, then drag downwards to catch the lines underneath.
Try highlighting the first paragraph. Make sure you ONLY get this paragraph, and not the lines above or below it.
Deselect your paragraph by clicking in a blank space and then practice highlighting the first two paragraphs.
Now let's see what we can do with highlighting!
|
Copy and Paste A very common tool that uses highlighting is called "copy and paste". Copy and pasting allows you to copy text and put it somewhere else without having to type. To practice, we're going to copy the words that you see on the right into the boxes that are next to them. First, highlight the word "Alphabetically". Then, press and hold the Ctrl key on your keyboard and tap the C key. This stores that word in memory. Now, let go of the Ctrl key. Then click in the box next to the word so that you can see the blinking cursor. Press and hold the Ctrl key again and tap the V key. This pastes the remembered word into the box. |
Copy and paste each word into the box next to it. |
Congratulations!

|
You made it! |
You have performed the basic mousing skills needed to interact with a computer. Now you are ready to practice your skills by Mousercising.
- or -